


CAD MODELING and RENDERING
See your project before it's built by using professional 3D Visualization

CAD Modeling and Rendering during the planning process are powerful marketing and communication tools to showcase the new development to potential buyers or investors. For 25 years I have been bringing projects to life with 3D CAD modeling technology.

Advanced Software
Since the mid 1990’s I have been presenting all projects for my industrial metal fabrication business in CAD 3D format. With recent dramatic improvements in material visualization and animation software, formerly grayscale 3D models can now quite easily be brought into reality. Computer models can now rival actual photographs – with the great advantage of viewing these ‘photographs’ prior to actual product development.
Unmatched Expertise
My skillset far surpasses CAD modeling and rendering. This includes often overlapping requirements for drone photography, photo editing, video editing, and A.I. voiceover technology. In 2014 I entered the ground floor of drone photography. Ten years and many equipment upgrades later I can offer professional and experienced aerial photos and 4K video services. I also have over a decade of experience with photo and video editing via high-end software.
A.I. Voiceover
Newly added to my arsenal of applications is A.I. voiceover creation – added natural-sounding narration to presentation materials without requiring expensive voice talent. In total your final presentation materials can tell the complete story required for your next project.
- CAD Shop Drawings
- Custom Prototype Engineering
- Pre-Design Concept Development
- Architectural Renderings
- Floor Plans and Site Plans
- Tradeshow Exhibits
- Retail Displays
- Commercial Development Projects
- Photo Editing
- Video Editing
- Drone Photography
- A.I. Voiceover Technology
Here is the process when your company needs renderings and visual materials:
Gather all of the necessary CAD drawings, images, text, audio, storyboards, and logos required for your project. Create an outline of the final media required with as many details as possible.
Write out a general description of your required media and purpose of the project. Put together all of the information you can share for the project, including:
- CAD Drawings
- Sketches | Illustrations
- Photos and Images
- Logos and Graphics
- Text for Narrations
- Storyboard for Video
- Questions and Ideas
- Timeline Requirements
Present your outline and list of information you have gathered for the project. Contact See it CAD to discuss pricing. Once parameters are agreed upon files will be shared for step 3
info@seeitcad.comOnce you have shared availabel information I will begin by creating the 3D models. The first version will be presented in hidden line or grayscale format for approval before moving on to the next step.
Models created and shared in grayscale format for ocean-side condo building

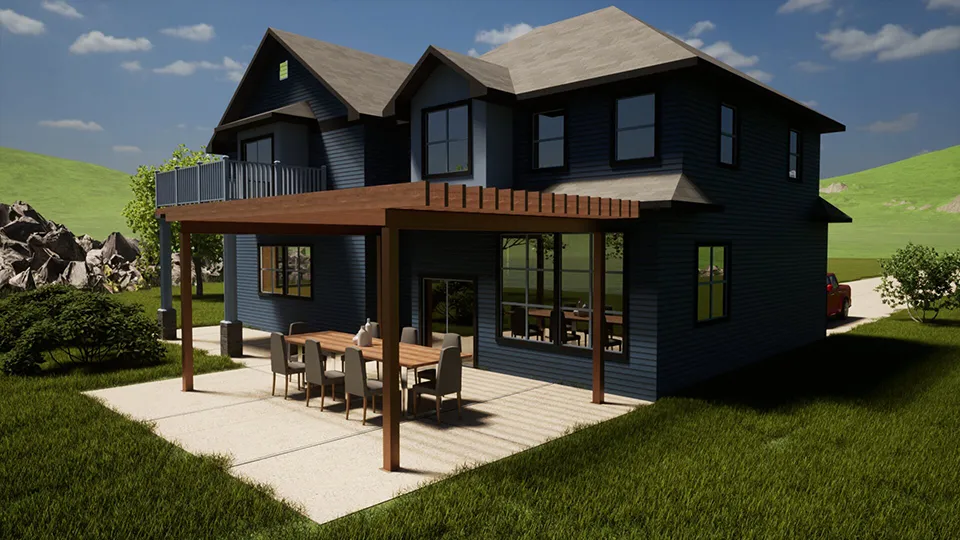
Once basic models are approved I will add materials and textures giving realistic appearance to each object. Before moving on we will ensure the rendered models are as expected.
Realistic materials added to model and rendered for approval

If required, your presentation materials will be added to a scene that can include vehicles, people, and background landscapes. With use of standard object libraries we can fill in the scene to fit presentation requirements.
Scene populated with people, vehicles, trees, lights, etc

The completed scene then needs to be properly arranged and rendered. Lighting conditions and camera angles will then be fine-tuned for your final renderings.
Optimum views and lighting conditions for specific project are chosen

If your project requires object movement or walkthrough animations, video clips will be created to match your storyboard. Or it may be overlay graphics, text, logos, and image transitions you require. A preliminary video will be created to identify potential changes.
It may be that your media is perfect the first time around. But that is not expected. Often the need for small adjustments only becomes evident after viewing the final project. Final adjustments will be made to ensure the final product meets your expectations.